Capture legendary photos!
This is what the designers of the Photopills ! It's the essential tool for planning your outdoor photos.
No matter what type of photography you like, landscape, milky way, moon, sunrise, sunset, architecture, solar eclipse, lunar eclipse, time lapse, wedding, portrait or travel etc ... PhotoPills is the planning application for all image hunters. The aim of this smartphone application is to plan your photos in advance so that you're in the right place at the right time to take the best possible photo.
1. What is Photopills?
As you can see in the presentation above, Photopills is a smartphone application. Personally, I'd say it's more like a suite of applications ! When you launch the application, you'll be taken to 3 tabs: My content, a widget table (called pills) and academy.
My content contains 5 widgets corresponding to your backups, settings, schedules and points of interest.
AcademyIt's your learning centre, because yes, there is a steep learning curve, but it's well worth it, I promise you 😉 ! Mastering the application will do you a world of good.
The Widgets table At the time of writing, there are no fewer than 16 widgets available in this section.
As you can see from this list, it's a real Swiss army knife for photographers. Let's take a look at the most interesting widgets. (I'm leaving out the tables and calculators, as the names of the widgets speak for themselves. They're useful and practical, and give you everything in one app).


2. What can this planning application do?
In my opinion, this is the heart of Photopills. The concept here is to have all the tools you need to plan and produce an imaginary photo.
This planning consists of finding the right point of view, on the right date and at the right time for the scene you imagine will take place. So, to plan a photo, you need to know where the sun, moon, eclipse, meteor shower or Milky Way will be for a given location, date and time. This planner will provide you with all these elements, quickly and efficiently!
Let's look at the 4 key parts of the planner:
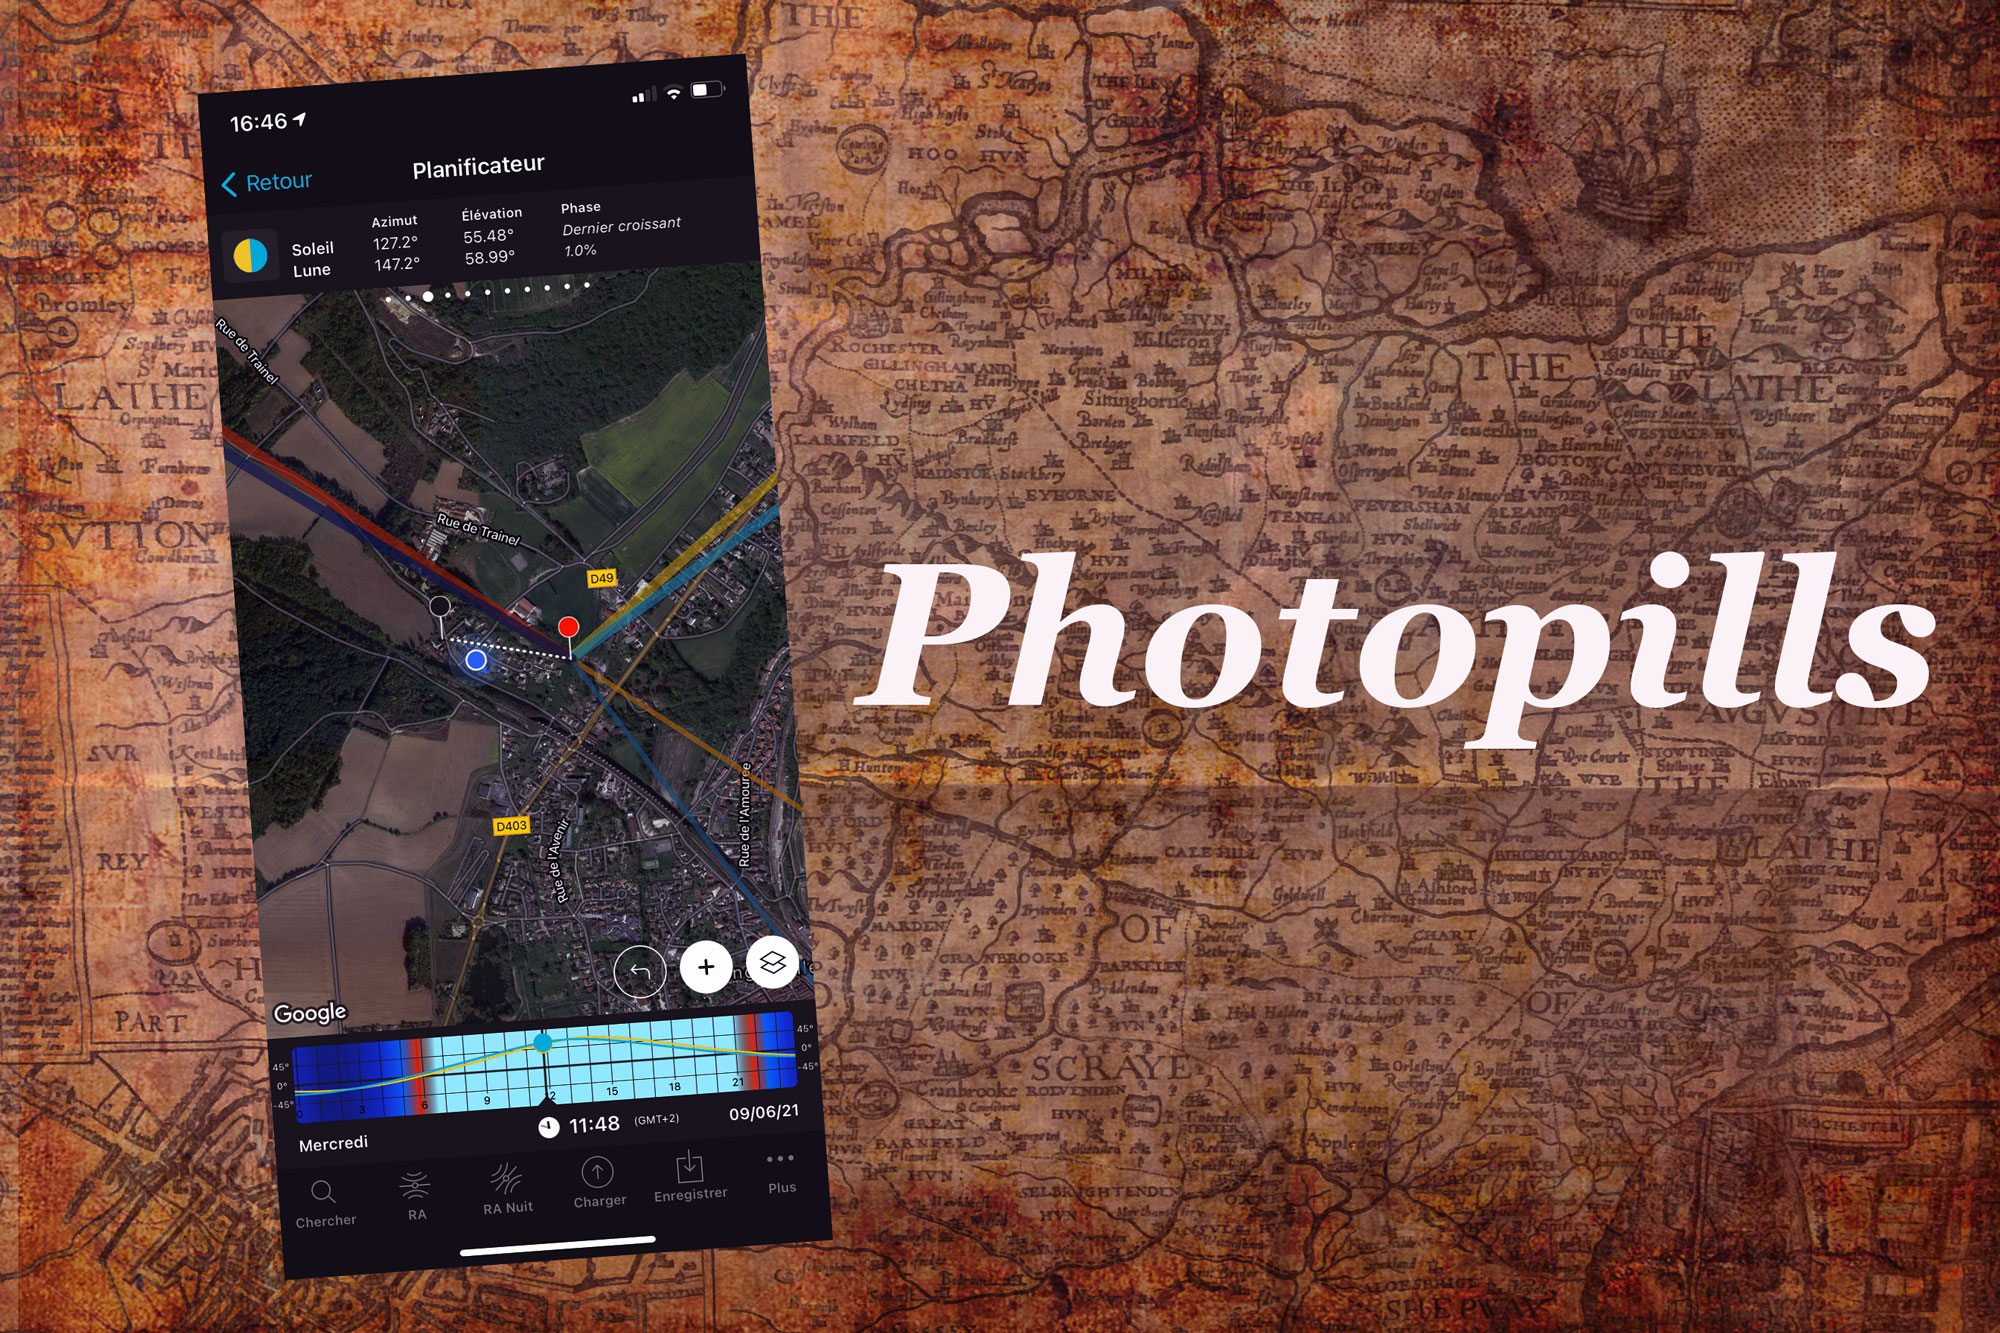
The top panel of the Photopills planner
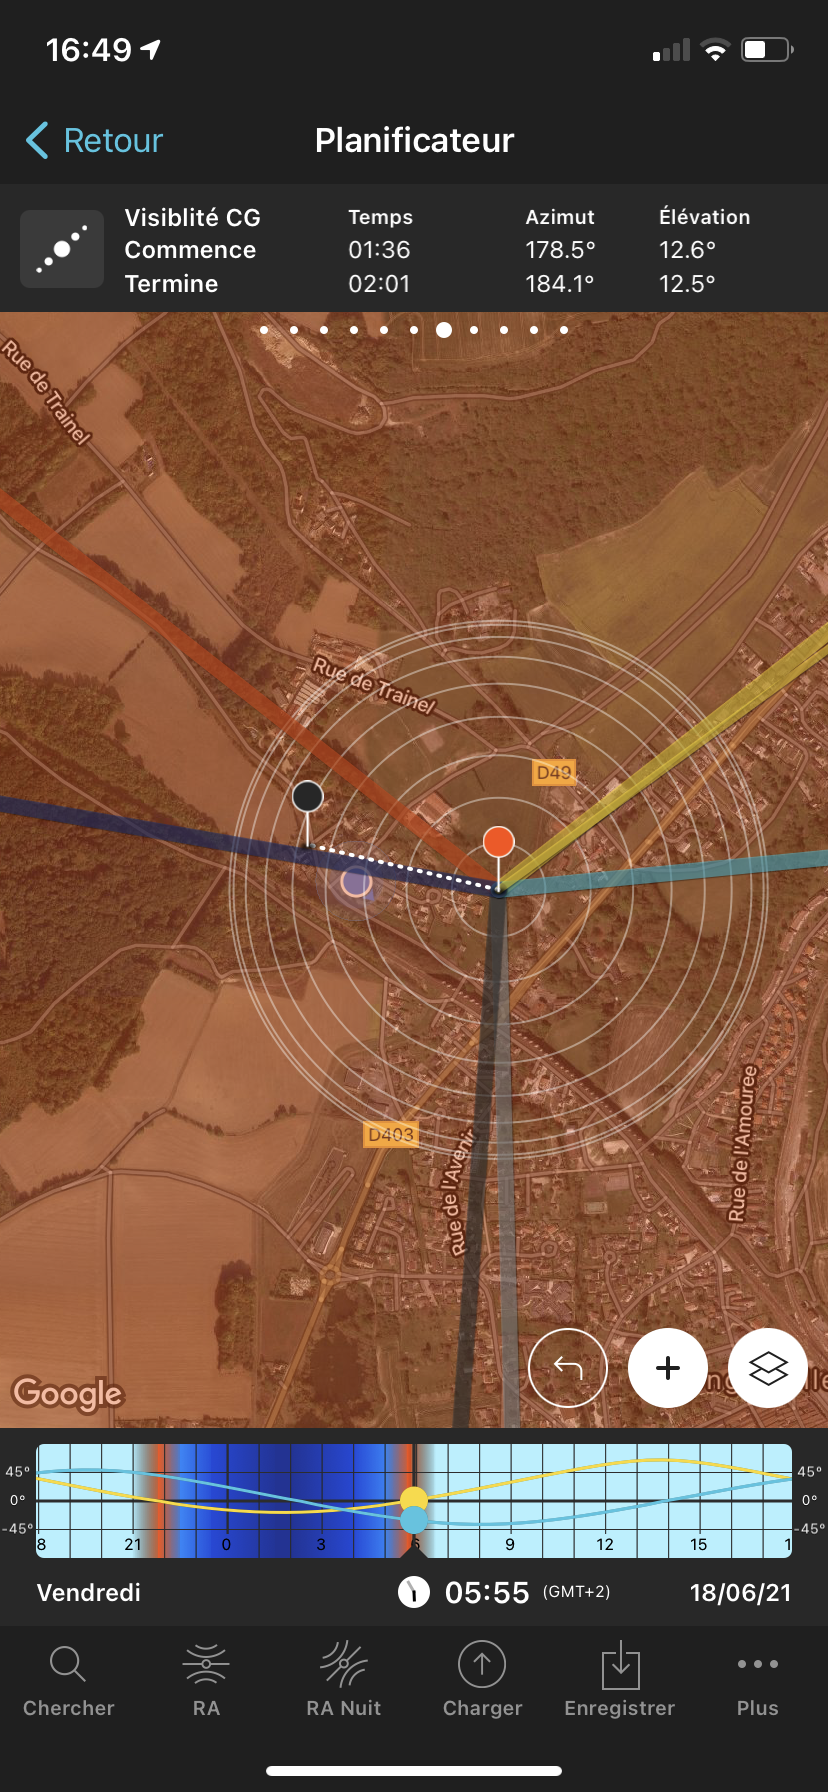
This is where you'll find all the information on light, the sun, the moon, the Milky Way, shadows, geodesy (terrain topography), meteor shower and eclipse for the position of the red pin and the selected date and time.You can slide your finger right or left to move from one panel to another.
Panel 1
This is a shadow length calculator. You have a button to determine the height of an object and obtain the length of the shadows on the map. Use it to plan the shadows (Sun and Moon).
Panel 2
To pin and obtain geodetic information (depending on the topography). You have a button to activate the black pin on the map, place this black pin on the possible obstables on the trajectory of your objective, the red pin on your planned capture position. This will allow you to determine whether the sun, moon, etc. will be visible or not depending on your position and the topography, or whether an obstacle will interfere with your project. I think it's brilliant! 😎
Panel 3
This is the Sun/Moon position (azimuth and elevation) and information on the lunar phase. You have a button to activate the sun information layer and the moon information layer on the map.
Panel 4
This includes information on the time of sunrise and sunset (and azimuth) and a moon phase image (press to switch to the next important moon phase).
Panel 5
Twilights (civil, nautical, astronomical). There's also a button to activate the Twilights layer on the map.
Panel 6
Also very useful are the magic hours for photographers (golden hour, blue hour).
Panel 7
The Milky Way is visible. You have a button to activate the "Milky Way" layer on the map.
Panel 8
This panel shows the quality and position of the Milky Way. An image of the position of the Milky Way (press it to pass the time to the next new moon).
Panel 9
Information about the eclipse (date, type, magnitude). Button to select the eclipse. And activate the Eclipse layer on the map.
Panel 10
The phases of the eclipse. Image of the eclipse phase (press to advance to the next phase).
Panel 11
All the information on the meteor showers (name, period of activity, peak date and time, radiant position and meteors/hours of all the meteor showers active on the selected date). The button is used to select the meteor shower and activate the meteor shower layer on the map.
The planner's card
The red pin
This is the capture location, i.e. your position. Place the red pin where you want to plan your shot. As you plan, you'll change the position of the red pin until you find the right capture point for your photo project.
The black pin
You activate this black pin from panel 2. Place it on your subject or wherever you want to measure the angle of elevation in relation to the red pin. It helps you understand the topography of the terrain when planning a shoot. Use the time bar to change the time and align the sun/moon/Milky Way azimuth line with the black pin. When the Sun / Moon / Galactic Centre azimuth line is aligned with the Black Pin and is dotted, then the obstacle (hill, mountain) is hiding the Sun / Moon Centre etc. When it is not dotted (continuous), the Sun / Moon will be visible.
(+) Card button
Activate the map toolbar to access the GPS button (place the red pin where you are), the move red pin button, Undo/Redo, expand the map, swap pins, and expand map lines, or display your location on the map, the map type, the compass, and finally the display of the lock buttons.
Map settings button
Located next to the Map (+) button, the Map Settings button lets you choose between Camera mode, Drone mode, map type, map tools, map layers (decide what information you want to see on the map) and reset map layers.

Map information
View the main information layers Sun, Moon, Milky Way, Twilight, Shadows, Geodesic and Eclipse on the map for the position of the red pin and the date and time selected. You control what you see on the map with the Map Settings button and the top panels. Oh, and you can rotate the map!
The Photopills time bar
Use this time bar to change the date and time by sliding your finger. If you know the date on which the photo was taken, set it using the time bar.
Options at the bottom of the screen
Find / Search
Use this option to determine when the Sun or Moon will be where you want it in the frame, in the composition of your photo.
Augmented reality (AR) view
Use the AR option to view the position and trajectory of the Sun and/or Moon according to the position of the red pin and the selected or desired date and time.
Night-time augmented reality view (night-time AR)
Use the Night AR option to view the position of the Milky Way based on the position of the red pin and the selected date and time.
Load
Use the Load option to load a saved photo map. Also place the red pin at a location based on an address, a saved point of interest, latitude / longitude and a geotagged photo.
Save
Use the Save option to save a photo map or point of interest to your list.
Date (Plus button)
Use the More> Date option to set the date, time and time zone.
Altitudes (Plus button)
Use the More> Altitudes option to manually set the altitude and offset of the black and red pins.
Horizon (Plus button)
Use the More> Horizon option to adjust the sunrise/sunset and moonrise/set times and azimuths to the height above the horizon. Very useful if you plan to photograph from the top of a mountain, for example.
Action (More button)
Use the More> Action option to share a photo map or location, add an alert to the calendar, send the position of the red pin to the map and copy the coordinates of the location.
3. ways to use the planner
In terms of workflow, designers have 2 options in mind:
The date or dates of your trip or shooting have already been scheduled
This is the most common. For example, when you want to photograph next Sunday's sunset, or the next full moon, or a specific eclipse, or the next major peak in the meteor shower, or the Milky Way on the next new moon.
With the planner you can :
Choose a date and/or time using the time bar (the coloured bar below the map).
View key information about light, shadows, the sun, the moon, the eclipse, the meteor shower and the Milky Way on the map and the upper panels (above the map).
Choose a shooting location by moving the red pin you see on the map.
Then keep changing the shooting location (red pin) and the shooting time until you find the photo you want.
And if the photo you want isn't possible on that date, you'll have to find another date! 🤓
You don't have the date(s) of your trip or shoot!
In this case, you know the location. You clearly have the photo you want to take in mind, but you need to find out when the Sun or Moon will be in a particular position in the frame. For example, in the top right-hand corner of Tower Bridge.
In this case, you'll need to:
Place the red pin on the desired shooting point.
And use the search option (in the bottom left-hand corner) to find the ideal date and time for your capture.
So far so good, isn't it? I think I've covered the most important features of the Photopills concept. Enough to intrigue you? Do you already use Photopills? If so, how?
There's a lot more to say about this fantastic application, which I still use in preparation, as well as in the field. Because even when I'm planning, I like to leave plenty of room for adventure and surprise, as you know, and using augmented reality, for example, to visualise the position of the sun at sunset in real time at a given location is very practical. It meant I came home with a bit more than I'd expected! It's always great! 😜
To give you some examples of my planning, I invite you to have a look at ,
The photo of Mont Saint Michel from the Normandy and Brittany coasts article The golden hour is around 9pm.
The article Successful sunset photos where I calculated the position of the sun, the time and its elevation near Tower Bridge.
That's it, I'll probably add to this article, as this application is so useful and packed with information.
I look forward to seeing you soon,
Good planning and good shooting to you all,
David

