1 Different masks for different tones)
So here's the long-awaited sequel to luminance masks.
In this second part, the aim is to start with the "Lights" mask, and create additional masks to target the other luminance levels of an image.
Using this information you should be able to make a series of Photoshop scripts to create all the masks with a single mouse click, or use the Photoshop panel in Tony Kuyper (much more complete).
The 'Lights' mask is the starting point for the various luminance masks that can be created. The 'Lights' mask is useful if you want to adjust the bright areas of the image, but how do you target the even brighter areas, or the shadows, or the mid-tones which also frequently need adjustment. The selections made using these masks will have the perfect tonal gradation so that adjustments can be made without any border effects.
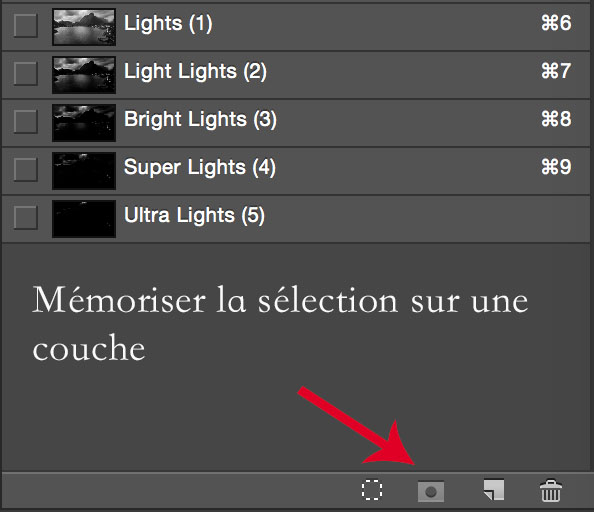
Here is an example of the masks used to target light areas of the image:

2. Masks for bright areas
To create masks to adjust the lightest tones, we're going to create intersections of the masks with themselves. An intersection corresponds to the common pixels between two selections.
First of all, retrieve the "Lights" mask by selecting it as we have seen. (in section 1 of luminance masks #1) (Ctrl/Cmd+click on the 'ligths' layer) Once the light dots are activated, do : Shift-Alt-Ctrl/Cmd+click on the "Lights" mask so that the intersection takes place, then click on the button to recover the selection on a layer.
The 'Light lights' mask comes from the intersection of the 'Lights' mask with itself, and the 'Bright lights' mask from the intersection of the 'Light lights' mask with itself, and so on. Each time, there is a gradual restriction of the selected pixels to the brighter and brighter sectors of the image. Look at the progressive tonal changes in the images above, and it is only in these lighter (white) areas that the adjustments are made. Shades of grey can be seen on these masks, which will ensure that the adjustments are perfectly progressive.
Although the 'Lights' mask seems to be a good choice for adjusting light areas of the image, the 'Light lights' and 'Bright lights' masks often give better results. In fact, the overly wide grey scale offered by the 'Lights' mask means that the adjustments risk also affecting the medium-dark areas of the image. The 'Light lights' and 'Bright lights' masks generally provide better protection for dark areas and better targeting of light areas.
3. Now let's create the masks for the dark areas.
To create the "Darks" mask, duplicate the lights layer and invert the "Lights" mask using the shortcut Shift-Ctrl/Cmd+I.
Then, for the following dark masks, simply intersect the masks with themselves as before, this time starting with the Darks mask. The selections will be increasingly restricted towards the dark sectors.
Below are the "Darks" masks:

As the 'Darks' luminance masks are the inverse of the 'Lights' masks, they can be considered as negatives. The white areas of these masks correspond to the dark areas of the image on which the adjustments will be made. Each mask progressively limits the selection to darker and darker pixels. If we use the 'Super Darks' mask, the lightest sectors of the image are essentially dark grey or black and will therefore remain unchanged whatever adjustments we make. Similarly, the 'Dark darks' and 'Shadow darks' layers give better results in practice because they preserve the lighter tones better, as the gradients are not excessive.
For intermediate tones or medium greys, masks are a little more complex to create.
To obtain the mid-tones masks, we need to remove the light and dark tones from an image.
To do this, select the entire image using Ctrl/Cmd+A, then subtract the 'Lights' layer and the 'Darks' layer using the shortcut Alt-Ctrl/Cmd+click on the mask you want to subtract.
To sum up:
- "Basic Mid-Tones = Lights and Darks are subtracted from the whole image.
- "Expanded Mid-tones = Light Lights and Dark Darks are subtracted from the whole image.
- "Wide Mi-tones" = "Bright Lights" and "Shadow Darks" are subtracted from the whole image.
- "Super Mid-tones" = "Super Lights" and "Super Darks" are subtracted from the whole image.
Here is an illustration of the result you should obtain:

In my experience, the "Basic mid-tones" and "Expanded mid-tones" masks are sufficient most of the time.
Depending on the image, these masks can appear very dark or almost black. If you use this mask in combination with a curve adjustment layer, you'll need to give your curve a very pronounced S shape to get any change in your image. In fact, you can go to extreme values and get only minor or measured changes to your photo in terms of contrast and saturation.
Now you know how to create luminance masks. In another article, we'll look at a series of tricks and the possibilities that can arise from them, other than simple adjustments.
A reminder
When creating masks, a dialogue box may appear. This dialogue box indicates that the dotted lines will not appearbecause no pixel selected has more than 50 % of opacity. This does not mean that there is no selection. It simply means that Photoshop cannot display the selection when the pixels selected have less than 50 % of opacity.
But that doesn't mean you can't get good results with selection. When you add, subtract and intersect with luminance masks, it is quite possible and common to obtain a very dark grey or even black mask.
The "Basic mid-tones" often looks like this: no luminous dots appear when the mask is loaded as a selection, but the adjustments will be clearly visible.

You will probably need to make some fairly extreme adjustments to the adjustment layer to see a noticeable change in the image, but the luminance mask will do its job over the expected range of tones.
To conclude, if this dialogue box appears, click ok and continue.
Enjoy yourselves,
David


