Le photo workflow or the workflow or even photo workflow is of the utmost importance, both for amateur photographers and, of course, even more so for professionals who have so many images to sort and catalogue!
Indeed, with digital photography, it's clear that many of us.., take more shotsLet's experiment with more different framings, let's make more various attempts because it doesn't cost more (unlike silver film) to explore our artistic madness in this way.
When you have several thousand or even hundreds of thousands of photos, sooner or later you have to sort them out, and to do that you need to be well organised. Simply organising your photographic files properly ensures that you'll be able to find your photos quickly, otherwise they'll be lost, and you'll save an enormous amount of time behind your screen!
And isn't losing photos sacrilege for a photographer?
In today's article, I'd like to talk about "the photo workflow and I'll tell you about mine.
1. Importing and cataloguing
Photo capture output Depending on the time available, I always go through more or less the photos taken on the back of my camera, and I delete the photos I'm sure I won't need. (If I have any doubts, I keep the photo.
Then, back at the computer, I import all my photos into a Capture One Pro session. Capture One Pro is fast and efficient, allowing me to work in sessions. (Read the difference between session and catalogue). The session means I don't have to deal with the sluggishness and slowdowns of managing a large catalogue, and I can work straight away on the first images imported onto the computer even before all my images have been transferred to my hard drive.
Incidentally, capture One now has the ability to manage large catalogues very efficiently. That's why, once I've done all my work in my project or my session, I'm able to use capture One, I then import my session into a master or main catalogue.
In this way when I'm working on a project, i.e. in a sessionNothing interferes with my workspace. Once the project is finished, by importing my session into a main catalogue, I can have my photos, after selection and sorting, archived and be able to find them very quickly. Another advantage of the main catalogue is that it allows me to trace images in the event of loss. " ? " in case of disappearance) and also allows me to browse through my files and make selections / albums or collections offline.
2. The sorting workflow
So watch out! A photographer's first instinct is to find the best photos taken and develop them immediately! Yes, in a hurry for a client! But otherwise it's not a good idea! Because once the photos in question have been developed the rest will fall into oblivion, and that's the start of the mess ! It's a bad habit that sets in and will continue to do so!
That's why, once you've imported your photos, without thinking, start sorting them! Here's how I do it in C1 (Capture One Pro) :
a. First pass
In this first RAPID passageIf you want to throw away your photos, I put a red label (or black flag in LR) on them. (out of focus, for example). This stage is very quick, it's a purge, no zooming to 100% or looking for small details! It's a rough clean-up, with only 2 shortcut keys used. (Red label and arrow)
At this stage, On1 Photo RAW's focus mask, which is also available on C1, can be very useful and help you to achieve faster results!
b. Second pass
In the second passage, With all the unwanted photos out of the way, I go through my images again, this time to make a note of them. I look at the different groups of photos again in the software's browser. This gives me the benefit of hindsight, and allows me to see which composition is the best by viewing the groups of thumbnails. This is a second, semi-rapid-speed filtration system.
I give one star to a group whose composition satisfies me.
C. Third pass
Finally, the detail stage! So far, we've done a quick filtering/elimination of the most beautiful misfires, as well as the worst compositions. All that's left are the good to excellent photos. Group by group, I compare the photos in each group and rate them. Here, I zoom in on all the photos in a group to check the image quality and I keep to the strict minimum: 1 to 3 photos per group.
I use the following scale:
- 1 star: selected photos, I'm keeping them, I think I can do something with them.
- 3 stars: decorative or illustrative photos.
- 4 stars: good photos, potentially Fine Art photos.
Once the filtration is complete, I can then develop the photos in my C1 dérawtiser.
3. RAW development
It's at this stage that the precision of the sorting you've already done will be of enormous benefit to you. Generally speaking, I filter my browser according to rating, which allows me to develop the best-rated photos first and the worst-rated last. This also allows me to copy and paste the processing settings from the first photo to the other photos in the same group, and sometimes even to the other groups. (At least one processing base) Quick and efficient.
Occasionally, for high ISO photos for example, I'll first process the noise from the high ISO photos and then move on to the lower ISOs, because depending on the quality obtained after processing, if I don't like it, I'll delete or downgrade the photo for complex processing if it's really worth it. Depending on the quality obtained after processing, if I don't like it, I'll delete or downgrade the photo for complex processing if it's really worth it (it will take time to retouch in Photoshop or third-party software, and won't fit into the standard photo workflow).
After developing each series, as the photos are processed, I re-note some of them. That's right, because after developing, some photos turn out in a way that I hadn't always imagined at the outset! Some photos reveal themselves during development. From 4 stars to 5, for example.
Once RAW development is complete, I create master files! I export all the developed RAW files en masse.
4. Editing master files
Yes, I must be one of those paranoid photographers! So I create Tiff files of all the selected and developed images for 2 reasons:
- Whatever happens in terms of RAW software (disappearance, change etc...), I have a basic file that I can always go back to.
- These master files need the Photoshop step. (complex clean-ups, finishing touches, effects, retouching, compositions, panoramas, vectorama, focus stacking, etc. - you get the idea).
This way, I never lose a published photo. on my online galleries. Even if, over the years, I re-develop a new version, I always have the master version 1 file next to the master version 2 file etc....
In my photo workflow, I try to remain independent of software, so if a disaster happens tomorrow, I can transfer my photos and catalogue them in another software package, and my master files are always in the same place, with the same rendering and always available. And if necessary, I can update my RAW processing from the raw file.
It is from these master files that I carry out all my complex and creative retouching in Photoshop. (or another pixel editor)
As all these stages can't be done in one go, or even in one day, I use the colour labels to determine what stage of work my images are at. This is important and necessary, especially when you have several projects in progress, with weeks of downtime for longer projects!
- Yellow: in RAW development
- Orange: RAW development completed
- Pink: master file awaiting Photoshop or third-party processing
- Green: master file completed, file ready for export
- Blue: File ready and optimised for printing
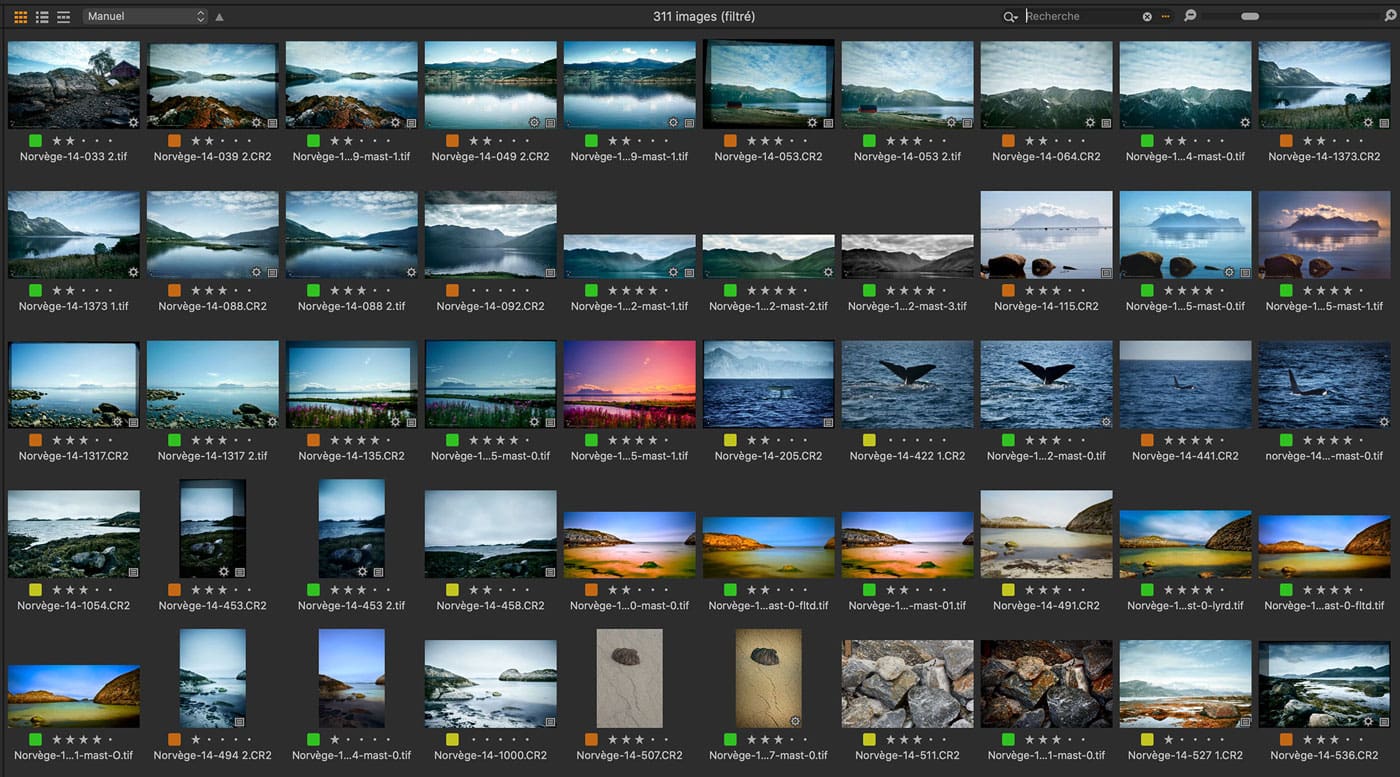
Capture On1 browser
5. Export and publication
This is probably the simplest stage in the photo workflow. You select the photos according to their destination, and run the export scripts. On C1, I select my ready photos, and launch an output with a format, a definition, a colour space etc. for social networks, another output for online galleries and so on, depending on my needs or those of the current project.
I hope that my workflow will inspire you and help you to improve yours. It's something that evolves with time, technique and the needs of each individual. It can be very different from one artist to another. The important thing is that it's effective and above all easy to remember, and as instinctive as possible for you! Otherwise, your workflow will not last!
How do you do it? Read more about Capture One you can visit these articles or those. Even more so if you wish to To learn how to use Capture One, click here..
David

